This tutorial will provide a step-by-step guide to install Raspberry Pi OS Lite on Raspberry Pi 3 or 4. Lite is a minimal version of Raspberry Pi OS without a graphical user interface (GUI).
If you want to set up a Headless Raspberry Pi to use it as a NAS server, Media Server, VPN Server, or anything that doesn’t need GUI, Raspberry Pi OS(previously called Raspbian) Lite is the right choice. So, let’s get started and install it.
What you Need
- Raspberry Pi 3 or 4
- MicroSD card 16GB or higher
- Raspberry Pi Imager software
- Router with internet connection
- Ethernet cable
- PC with SD card reader
Steps to install Raspberry Pi OS Lite
- Install Raspberry Pi Imager
- Configure OS options and write on MicroSD Card
- Start Raspberry Pi
- Connect Raspberry Pi via SSH
- Update OS
Now let’s check each step in detail.
If you prefer to watch these steps then watch the below video, else continue reading next section.
Install Raspberry Pi Imager
Raspberry Pi Imager provides a quick and easy way to install Raspberry Pi OS and many other operating systems on a MicroSD card. You can download it from https://www.raspberrypi.com/software/.
Once downloaded, install it on your PC.
Configure OS options and write on MicroSD Card
First, insert a MicroSD Card into the SD Card reader and connect that to your PC’s SD card reader slot. Note that any data on the SD card will be deleted in upcoming steps, so make sure you have taken a backup of any important data you have on the SD card.
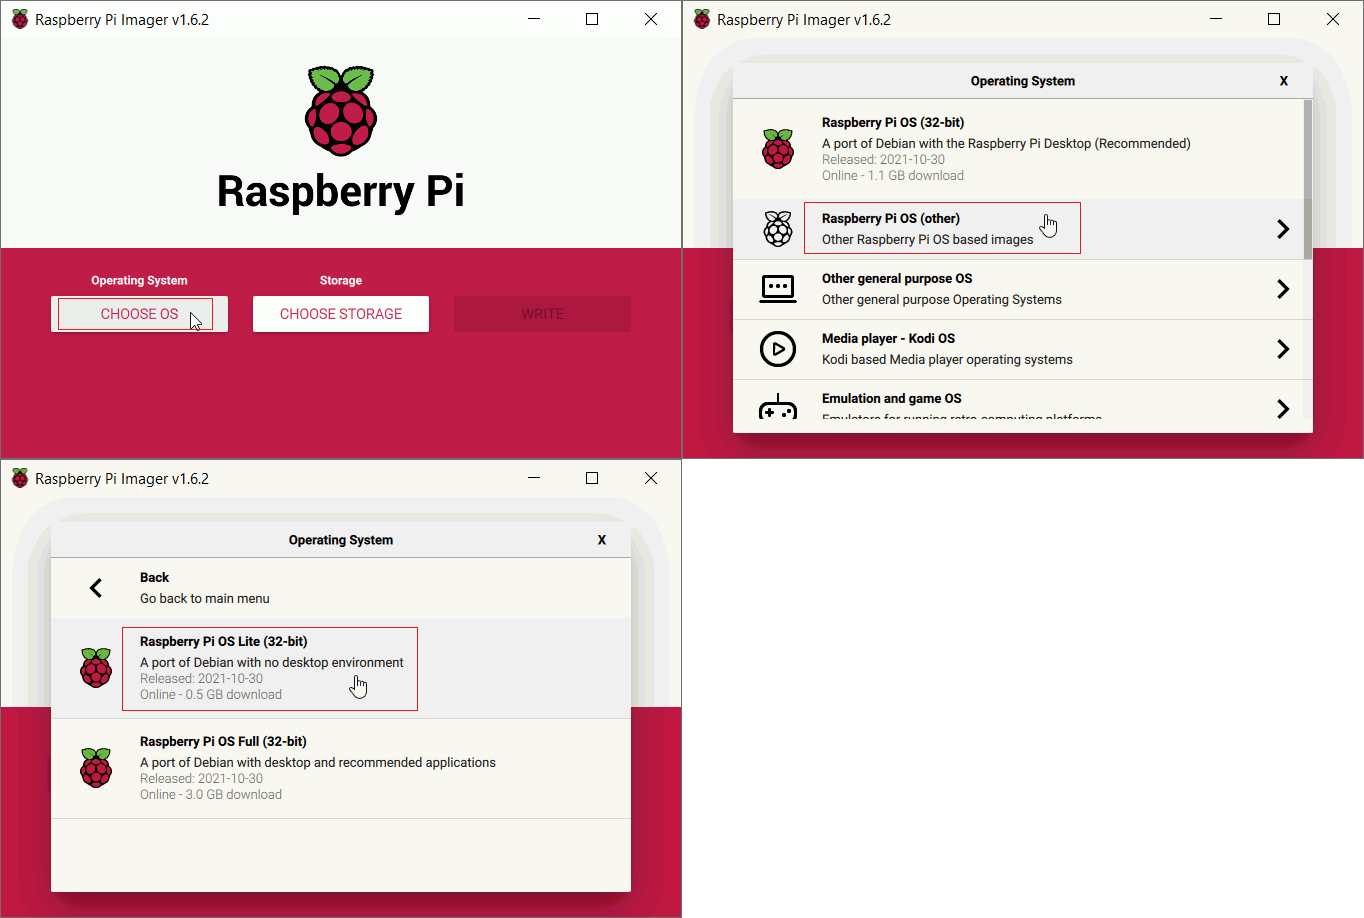
Now run the Raspberry Pi Imager. You should see three buttons on it, CHOOSE OS, CHOOSE STORAGE, and WRITE.
Click on ‘Choose OS‘. You should see a list of Operation Systems supported for Raspberry Pi. Select the ‘Raspberry Pi OS (other)’ option. Now you should see ‘Raspberry Pi OS Lite (32-bit)‘, select that.

Now type Ctrl + Shift + X to get the ‘Advanced Options’ screen and configure the following things:
- Set hostname (Optional)
- Enable SSH and set password for ‘pi’ user (must)
- Configure Wifi (Optional)
- Wifi Country (if you are configuring Wifi)
- Set locale settings – choose as per your region
- Eject Media when finished (Optional)
- Enable Telemetry (Optional)
Click on the ‘SAVE’ button to close the ‘Advanced Options’ screen.
Click on the ‘CHOOSE STORAGE’ and select your MicroSD card.
Click on the ‘WRITE’ button to start writing on the MicroSD card.
Start Raspberry Pi
Now it’s time to start the Raspberry Pi.
- Remove the MicroSD card from SD card reader of your PC and put it into Raspberry Pi.
- Connect Raspberry Pi to your router using ethernet cable (skip if you have configured Wifi)
- Connect Raspberry Pi to power supply and Switch On.
Connect Raspberry Pi via SSH
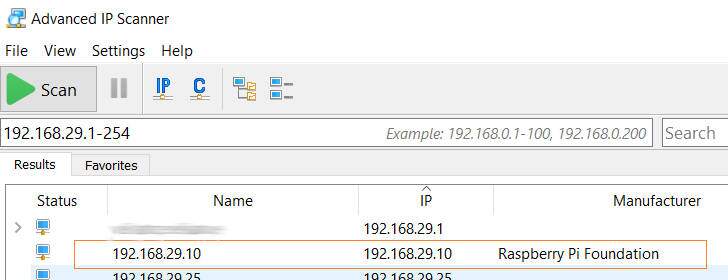
To connect Raspberry Pi via SSH first we need to find out the IP address of Raspberry Pi. To know the IP address of devices in your local network we have to use tools like ‘Advanced IP Scanner’. When you scan your local network, you should see result something like this:

Now open a command prompt/Terminal and execute the following command to connect Raspberry Pi via SSH:
ssh pi@192.168.29.10
Change to IP address with IP address you have got for Raspberry Pi in the above command.
Enter the password of ‘pi’ user you have set while configuring. For the first time, you will get a message related to ‘ECDSA key fingerprint’, type ‘yes’ for that.
Now you should be connected to Raspberry Pi via SSH.
Update OS
Once you are connected, the first thing we should be doing is updating OS packages. Run the following commands to update OS packages:
sudo apt update
sudo apt full-upgrade
‘sudo apt update’ – update the lists of packages for upgrades, along with new packages that have just come to the repositories.
‘sudo apt full-upgrade’ – download and apply available updates and also picks up any dependency changes. Note that for any further upgrades better to use ‘sudo apt upgrade’
Congratulation ! you have completed all steps to install Raspberry Pi OS Lite on Raspberry Pi.